
A faucet that drips or weeps around the handle isn't just annoying—it's usually a worn part that costs very little to replace. The trick is figuring out which part is failing, because the fix differs depending on whether you have a compression, cartridge, ball, or ceramic disc faucet. This guide walks through diagnosis first, then the repair sequence for each type.
Identify Your Faucet Type
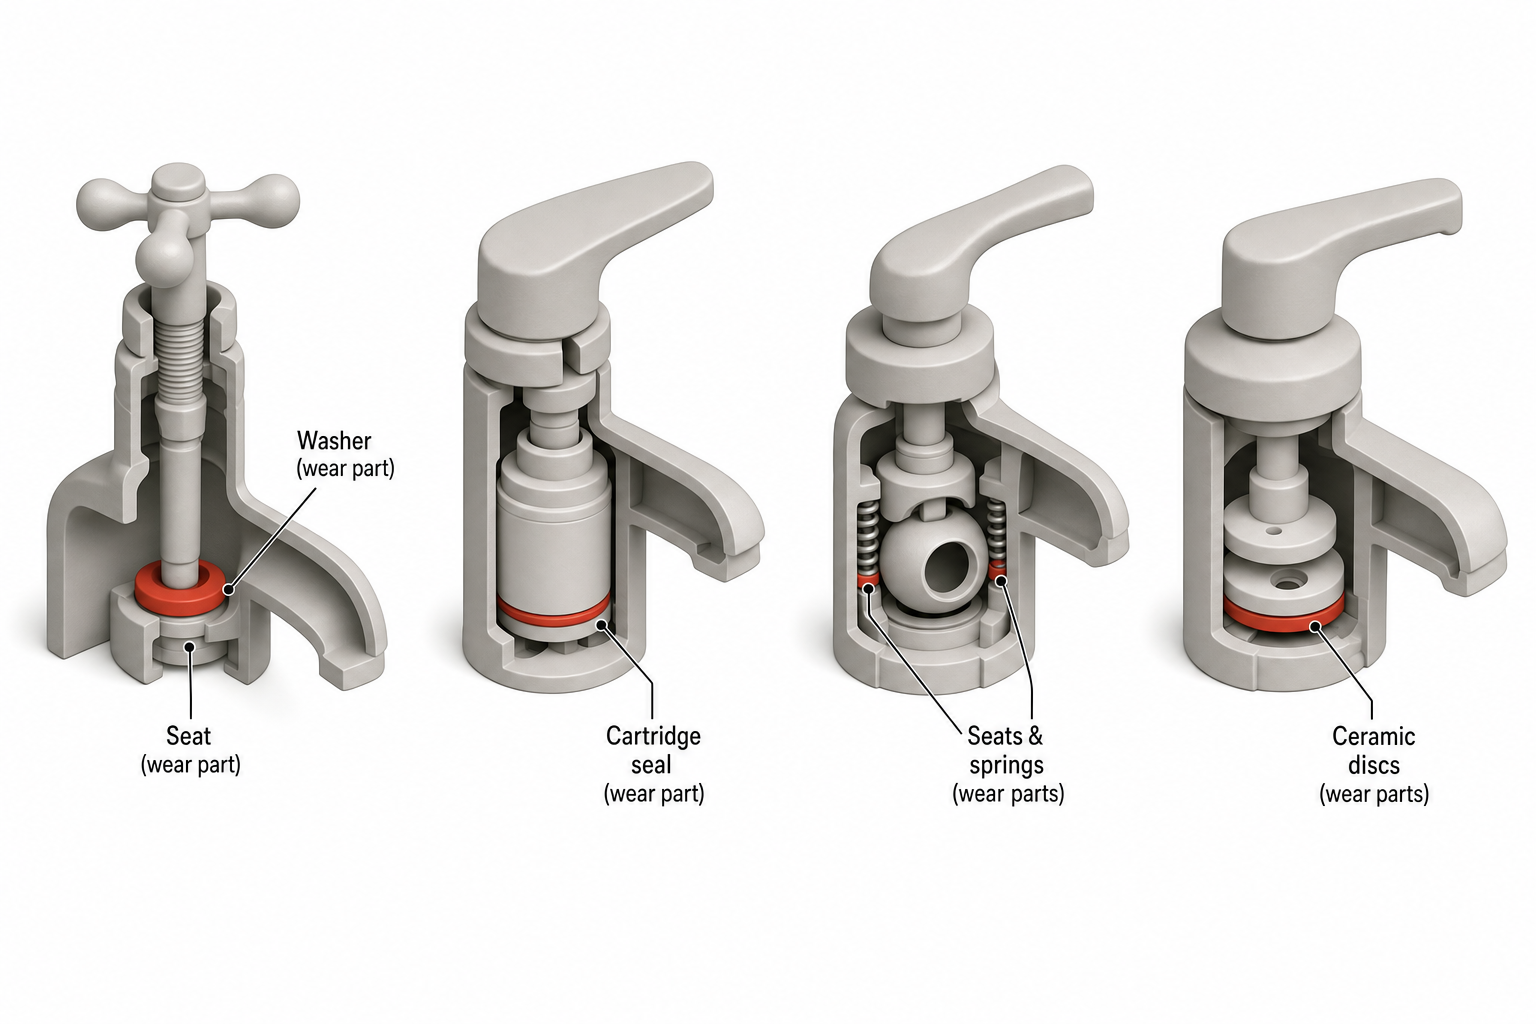
Before buying parts, figure out what's inside the handle. Look at how the faucet operates:
- Compression faucets have separate hot and cold handles that you turn until they stop, requiring a firm twist to shut off. These almost always use rubber washers and seats.
- Cartridge faucets have a single or double handle that lifts and turns smoothly with a defined stop, controlled by a cylindrical cartridge.
- Ball-type faucets use a single handle that moves in all directions over a rounded ball assembly, common on many single-handle kitchen models.
- Ceramic disc faucets have a single lever over a wide cylinder body and a very light, smooth action.
Where the leak shows up also matters. Dripping from the spout usually points to a worn washer, seat, or cartridge seal. Water pooling at the base of the handle or running down the faucet body usually means a failed O-ring.
Tools and Parts You'll Need
- Adjustable wrench or basin wrench
- Set of screwdrivers (flathead and Phillips)
- Hex key (Allen wrench) set, since many handle set screws use small hex sizes
- Needle-nose pliers
- Replacement parts matched to your faucet: washers, O-rings, or a cartridge—bring the old part or faucet brand/model info to match sizing, or check the recommendations below for common O-ring and washer assortments
- Plumber's grease (silicone-based) for reassembly
- A small container for tiny screws and springs
Step-by-Step Repair Sequence
1. Shut Off Water and Plug the Drain
Turn off both supply valves under the sink. If they're stiff or won't fully seal—common on valves that haven't been touched in years—it may be time to replace them, which is a separate small job. Plug the sink drain with a rag so no small parts fall in.
2. Remove the Handle
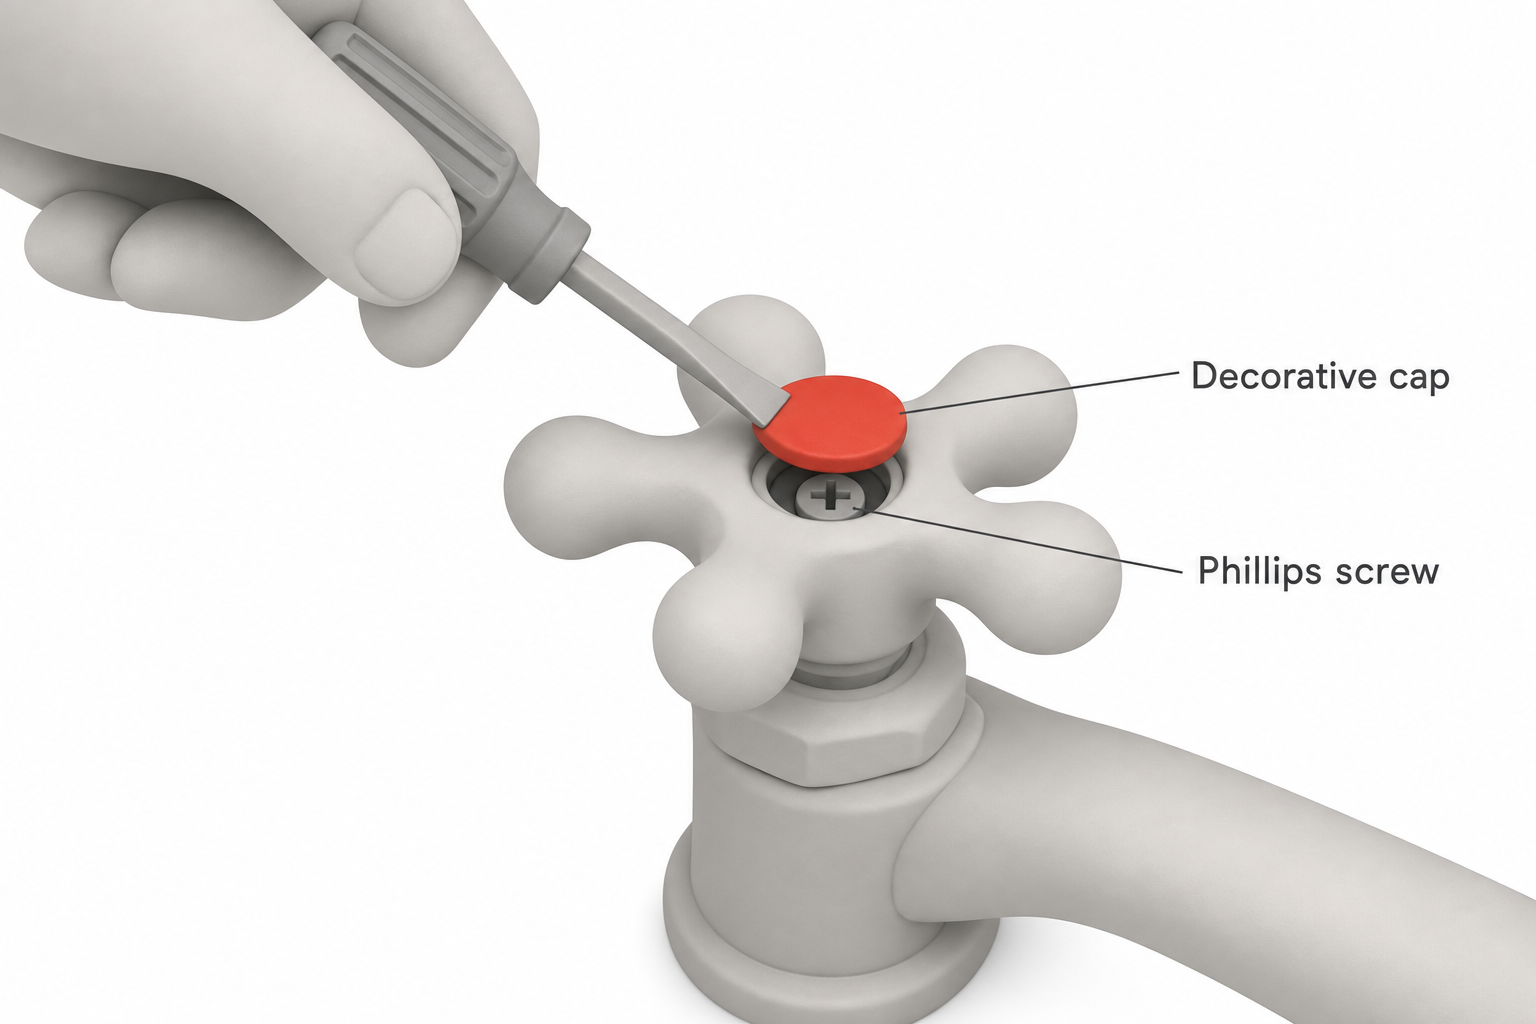
Most handles hide their retaining screw under a decorative cap on top—pop it off with a flathead screwdriver or your fingernail. Some handles instead use a small hex-head screw underneath, or a screw on the side accessed by loosening a set screw with an Allen wrench. Once removed, lift or wiggle the handle straight up to pull it off; mineral buildup can make it stick, so a gentle side-to-side rock usually frees it.
3. Diagnose and Replace the Failing Part
Compression faucets: After removing the handle, use an adjustable wrench to unscrew the packing nut, then unscrew the stem itself. At the bottom of the stem you'll find a rubber washer held by a brass screw. If it's cracked, flattened, or grooved, replace it with a same-size match. While it's apart, check the valve seat inside the faucet body with a fingertip—if it feels rough or pitted, it may need resurfacing with a seat-dressing tool or outright replacement, since a damaged seat will keep chewing through new washers.
Cartridge faucets: Remove the retaining clip or nut holding the cartridge in place (needle-nose pliers help with clips). Pull the cartridge straight up and out—it may take some wiggling or a light tap from below if corroded in place. Compare the old cartridge's height, width, and stem shape closely with the replacement, since cartridges vary by brand and even by model year. Coat the new cartridge's O-rings lightly with plumber's grease before inserting it, oriented the same way the old one came out (note the tab or notch position before removing it).
Ball-type faucets: These have more small parts: a cam, cam washer, rotating ball, and two spring-loaded rubber seats beneath it. Leaks often trace to worn seats and springs rather than the ball itself. A repair kit sized for this faucet type typically bundles the seats, springs, cam washer, and O-rings together, since they wear as a set. Note the ball's slot alignment with the faucet body's pin before removing it so reassembly is straightforward.
Ceramic disc faucets: Remove the cap and unscrew the disc cylinder assembly. Inside, two ceramic discs slide against each other to control flow; a neoprene seal at the base often causes leaks even when the discs themselves are fine. Inspect the seal and the disc surfaces for scratches or mineral scoring—ceramic discs rarely wear out quickly, but the seal beneath them does.
4. Replace O-Rings on the Faucet Body
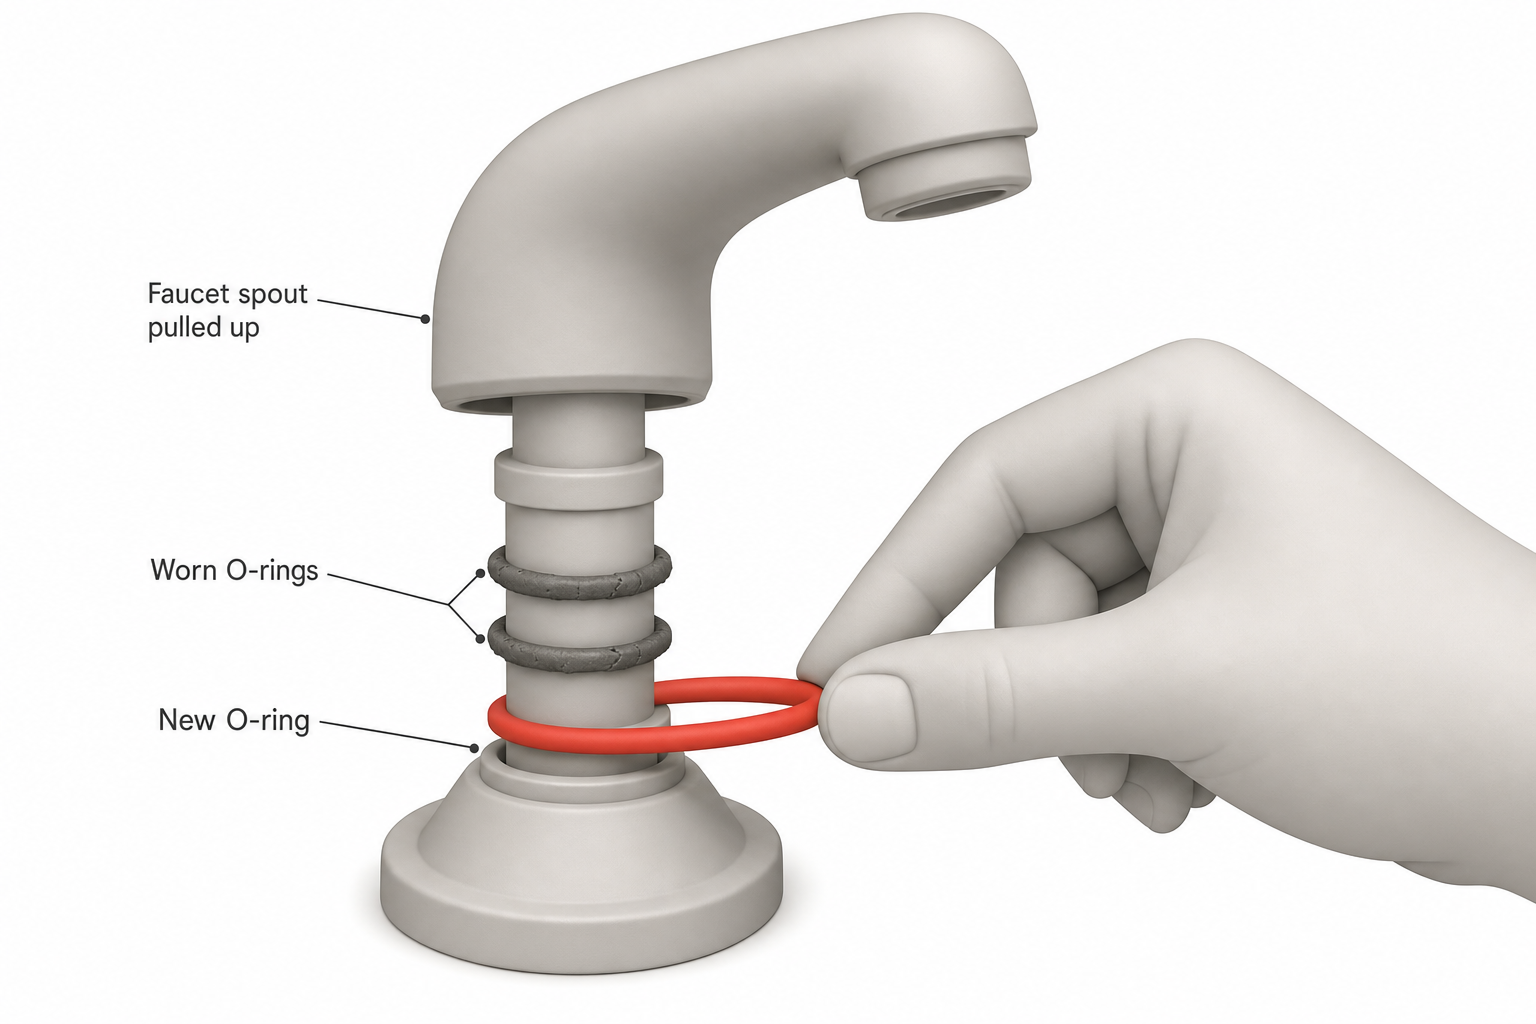
If water is leaking from the base of the spout or around the handle rather than dripping from the spout tip, the culprit is usually one or more O-rings on the faucet stem or spout housing. Slide off the old O-ring, clean the groove of mineral deposits with an old toothbrush or plastic scraper, and roll on a new O-ring of matching diameter. A light coat of plumber's grease helps it seat properly and extends its life.
5. Reassemble and Test
Reverse the disassembly steps, tightening nuts snugly but not overtight—overtightening can crack plastic cartridge housings or distort washers. Turn the water supply back on slowly and check under the sink for drips at the supply connections before checking the handle and spout. Run the faucet through hot and cold, and cycle the handle fully a few times to seat new parts and flush out any debris.
When to Call a Professional
If you've replaced the washer, cartridge, or O-rings and the faucet still leaks, the valve seat or the faucet body itself may be damaged beyond a simple parts swap. Persistent leaks after a proper repair, corroded shutoff valves that won't close fully, or any sign of water damage inside the cabinet are good reasons to call a licensed plumber rather than keep replacing parts.
FAQ
Why does my faucet still drip after I replaced the washer? The valve seat it presses against may be pitted or worn, which keeps a new washer from sealing properly; the seat may need resurfacing or replacement, or the whole faucet may be due for an upgrade if it's an older compression style.
How do I know if I need a washer or an O-ring? Drips from the spout when the faucet is fully off usually point to a washer or seat problem (or a worn cartridge), while water seeping around the handle base or down the faucet body usually points to a failed O-ring.
Can I use any replacement cartridge for my faucet? No—cartridges are brand- and model-specific in height, width, and stem pattern. Bring the old cartridge to a hardware store or match it against manufacturer part diagrams before buying a replacement.
Is it normal for a faucet to leak a little right after a repair? A few drips in the first minute after reassembly can be trapped air or water working through new seals, but a leak that continues after running the faucet a few times usually means a part isn't seated correctly or wasn't the right size.
How often do faucet washers or cartridges need replacing? It varies widely with water hardness and usage, but many homeowners find washers or cartridges last several years before showing wear; mineral-heavy water tends to shorten that lifespan.