
A window air conditioner is designed to collect condensation and either drip it outside or fling it against the condenser coil to evaporate. When water shows up on your windowsill, wall, or floor inside the house instead, something in that drainage path has gone wrong. The good news is that a window AC leaking water inside is almost always caused by one of three simple issues: the unit isn't tilted correctly, the drain hole or pan is clogged, or a dirty filter is causing the coil to ice over and then dump water when it melts. All three are fixable in under an hour with basic tools.
Why Window AC Units Leak Water Indoors
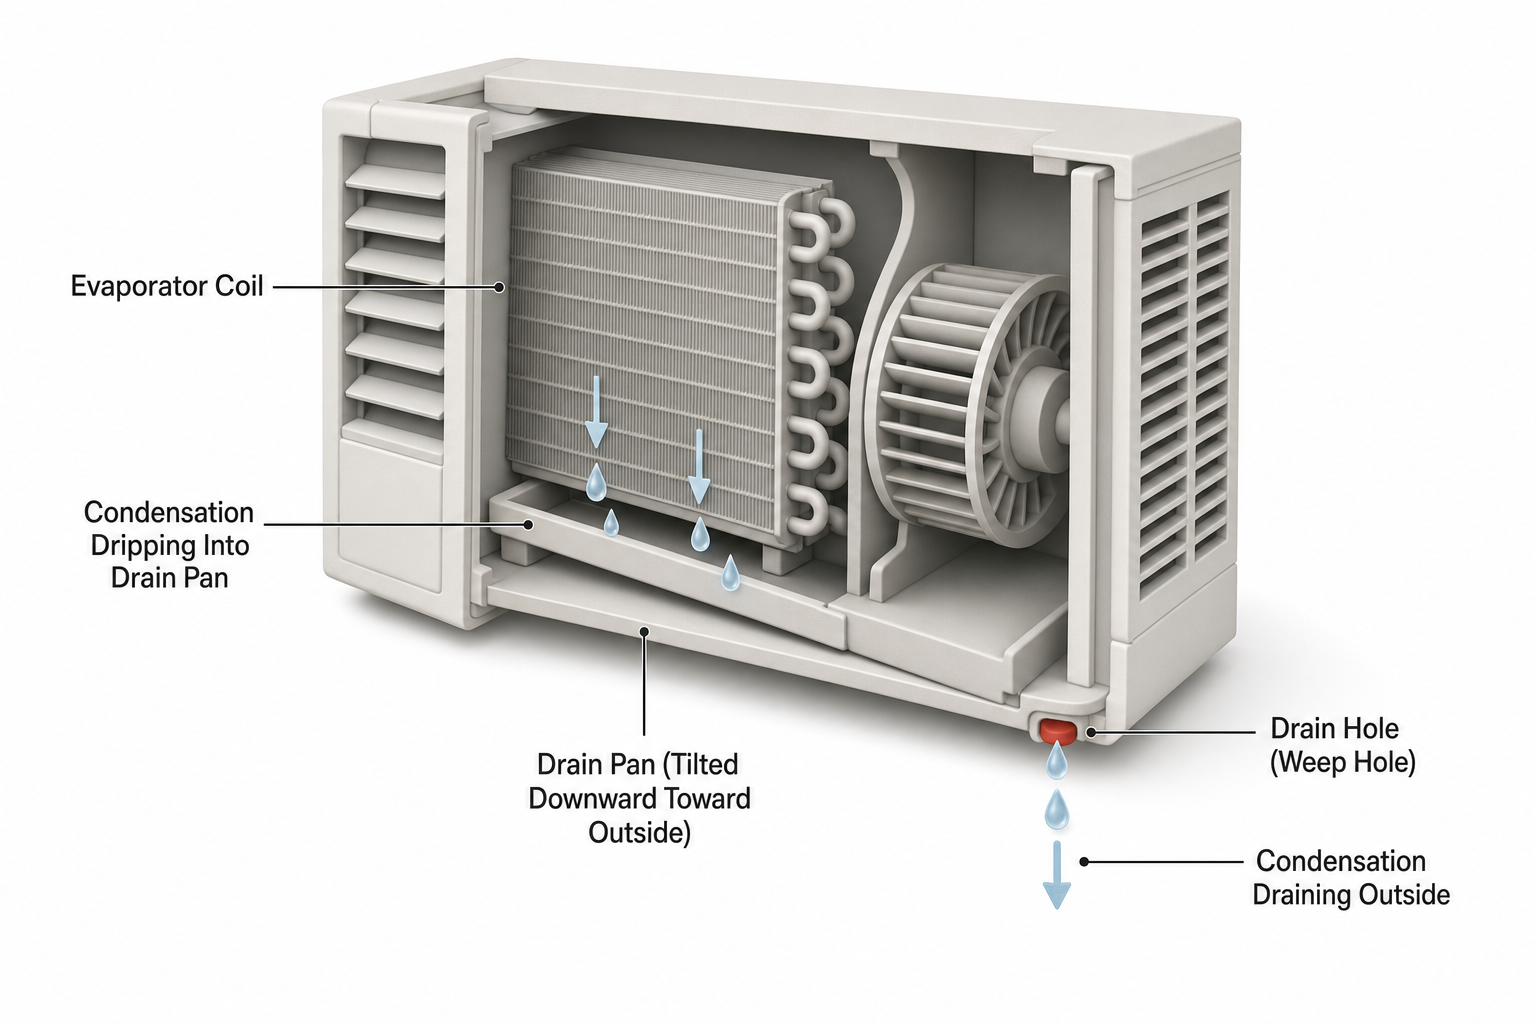
Inside the unit, the evaporator coil (the cold coil facing your room) pulls moisture out of the air. That water is supposed to collect in a drain pan at the base of the unit and either drain out a weep hole to the outside or get slung onto the hot condenser coil by a slinger ring on the fan, where it evaporates. If the unit sits level or tilted toward the room, or if that drain path is blocked, the pan overflows toward the indoor side instead of outside.
Step 1: Check and Correct the Tilt
Most manufacturers specify that a window AC should tilt slightly toward the outside, typically about a 1cm drop over the depth of the unit, so gravity carries condensation out through the drain hole instead of pooling toward the room.
- Turn off and unplug the unit before adjusting it.
- Check the tilt with a small level placed on top of the housing, running front-to-back.
- If the back (outdoor) edge is higher than the front, or the unit is perfectly level, that's likely your problem — water has nowhere to go but toward the room.
- Loosen the mounting screws or the accordion side panels enough to shift the unit, then shim the indoor edge upward. Thin wood shims, a folded piece of scrap lumber, or the leveling screws built into some mounting brackets all work.
- Re-tighten everything, reseal the side panels, and re-level to confirm a slight outward slope.
[!safety] Window units are heavy and often supported on a windowsill or a bracket several feet off the ground. Have a second person support the unit while you adjust it, and never lean far out an open window to check the outdoor side — if the unit is on an upper floor, treat this as a fall risk and consider calling a professional installer.
Step 2: Clear the Drain Hole and Pan
Even a well-tilted unit will leak inward if the drain hole is clogged with dust, mineral buildup, or debris that's blown in from outside.
- Unplug the unit and, if possible, pull it partway out of the window sleeve so you can access the underside — check your model's manual, since some units allow front-panel removal instead.
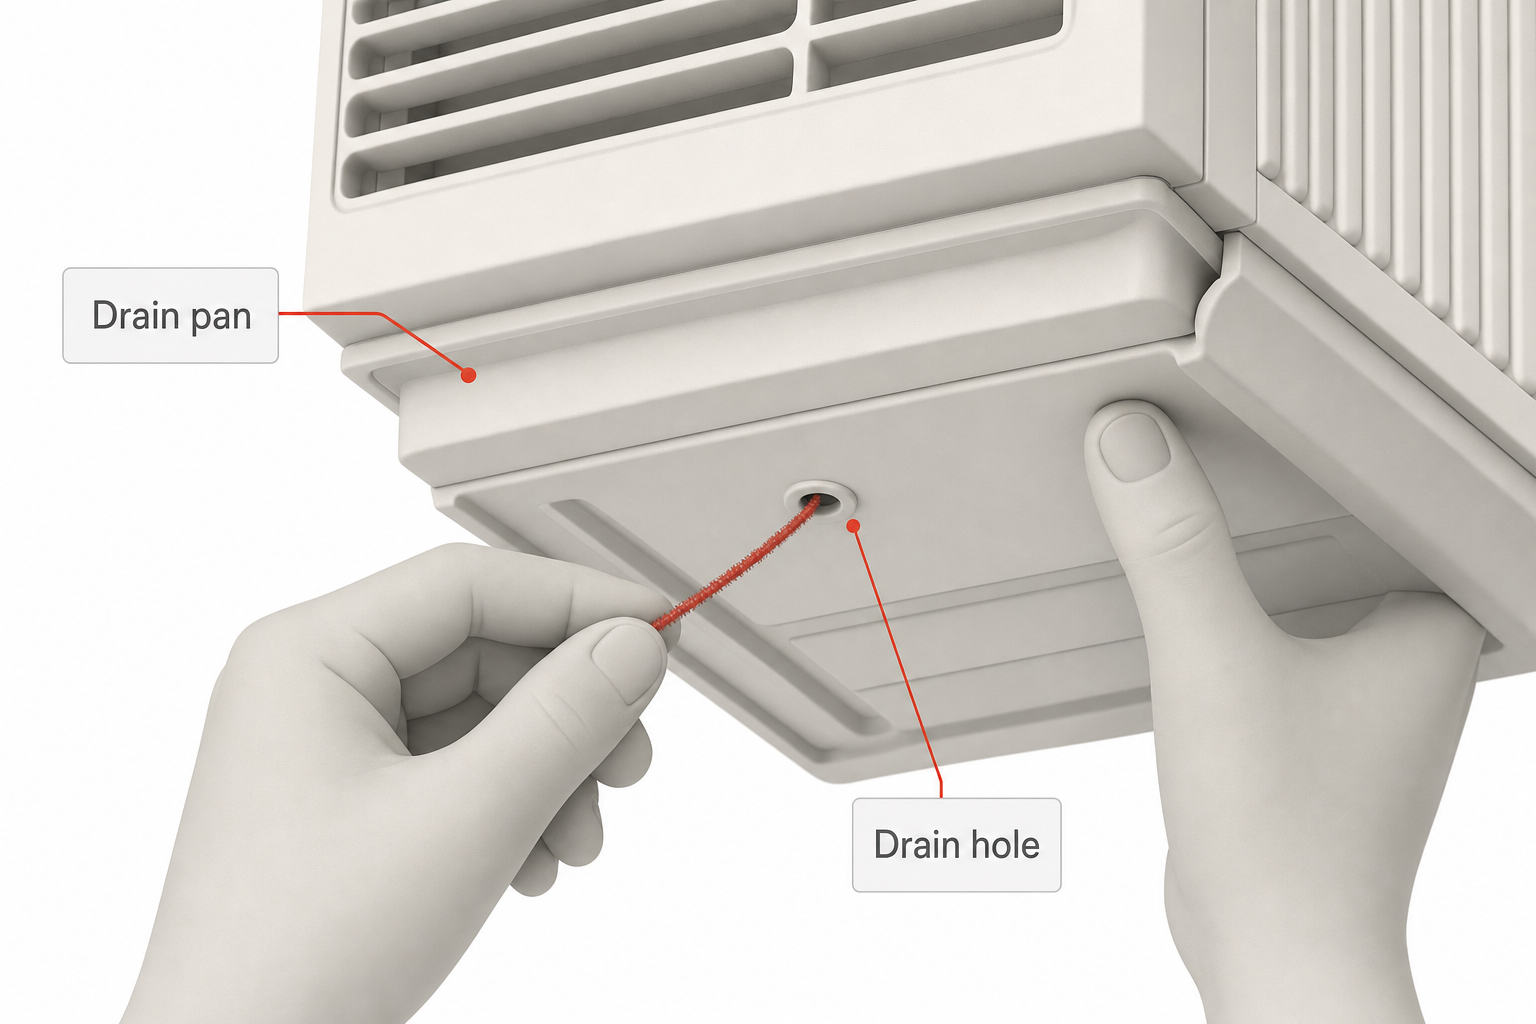
- Locate the drain hole(s) on the bottom of the housing, usually a single small opening on the outdoor-facing edge, though some models have a secondary hole for extreme humidity.
- Use a stiff piece of wire, a small zip tie, or a pipe cleaner to gently probe and clear the hole. Avoid metal tools that could gouge or crack the plastic pan.
- Flush the drain pan with a small amount of water (a cup poured slowly) and watch that it exits cleanly outside rather than backing up.
- If the pan itself looks caked with mineral scale or algae, wipe it out with a cloth dampened in a mild vinegar-water solution before reassembling.
Step 3: Inspect and Clean the Air Filter
A clogged filter restricts airflow across the evaporator coil, which makes the coil run too cold and ice over. When you later turn the unit off or the ice partially melts during a defrost cycle, that meltwater can overwhelm the drain pan and drip inside faster than the pan can handle.
- Unplug the unit and remove the front grille or filter panel — most slide or snap out without tools.
- Look at the coil behind the filter. A layer of visible frost or ice confirms restricted airflow is the cause.
- If iced over, unplug the unit and let it sit for several hours so the ice fully melts before running it again — running it while frozen just adds more meltwater to the pan.
- Wash a reusable filter with warm water and mild dish soap, or replace a disposable one; let it dry completely before reinstalling.
- Vacuum any visible dust off the coil fins with a soft brush attachment, being careful not to bend the thin aluminum fins.
- Going forward, clean the filter every 0.61m... actually check filters on a schedule rather than a distance — most manufacturers recommend every two to four weeks during heavy use, especially in dusty or pet-heavy households.
Other Things Worth Checking
- Fan speed and slinger ring: on some models a small ring or set of blades on the fan is supposed to fling condensation onto the hot condenser coil. If it's broken or misaligned, drainage relies entirely on the weep hole and tilt.
- Oversized or undersized unit: a unit that's too large for the room can cycle on and off quickly without running long enough to properly drain, leading to occasional drips. An undersized unit running constantly in high humidity can simply produce more condensate than the drain path handles.
- Window sleeve gaps: confirm the foam or seal kit around the unit is intact; gaps let in humid outside air that adds to condensation load.
[!region] Building and rental codes in some areas require condensate from window units to drain away from sidewalks, shared walkways, or neighboring units rather than dripping freely outside. Check local ordinances or your building/HOA rules before assuming outdoor drainage alone solves the problem.
When to Call a Professional
If you've corrected the tilt, cleared the drain hole, and cleaned the filter but the unit still leaks indoors, the issue may be a cracked drain pan, a refrigerant leak causing abnormal icing, or a failed fan/slinger assembly — all of which typically require opening the sealed refrigerant system or replacing internal parts.
[!safety] Never attempt to access the compressor, refrigerant lines, or internal electrical wiring yourself. Refrigerant work requires EPA-certified handling in the US, and internal repairs on a plugged-in unit carry a real shock risk. Call a licensed HVAC technician for anything beyond the filter, drain hole, and exterior tilt.
FAQ
Why is my window AC dripping water inside only when it's very humid outside? High humidity increases the amount of condensate the unit produces. If the drain path is only marginally sloped or partially restricted, it may keep up in normal conditions but overflow inward once humidity spikes.
Is it normal for a window AC to drip water outside? Yes — dripping from the outdoor side onto the ground below is completely normal and is the unit working as designed. The problem is specifically water appearing on the indoor side.
Can I fix the tilt without removing the whole unit from the window? Often yes. Many units let you loosen the mounting bracket screws or accordion panels enough to shim the indoor edge upward without fully pulling the unit out, though very heavy or older units may require full removal for access.
How often should I clean the drain hole? There's no universal schedule since it depends on dust and mineral content in your water and air, but checking it whenever you clean or replace the filter — roughly monthly during the cooling season — catches most clogs before they cause a leak.
Could the leak be refrigerant instead of condensation? Refrigerant leaks don't produce water; they cause reduced cooling and sometimes a hissing sound, and they can lead to ice buildup on the coil that later melts into water. If cooling performance has dropped along with the leak, have a licensed technician check the refrigerant charge.