A toilet that won't flush completely — leaving waste or paper behind, or draining with a weak, gurgling swirl instead of a strong siphon — is almost always caused by one of three things: a flapper that isn't opening fully or is dropping too soon, a chain that's the wrong length, or mineral deposits clogging the small siphon jet holes under the rim. None of these require replacing the toilet, and all three are within reach of a normal afternoon with basic hand tools.
This guide walks through diagnosing each cause in order, starting with the cheapest and easiest fix first.
How a Flush Is Supposed to Work
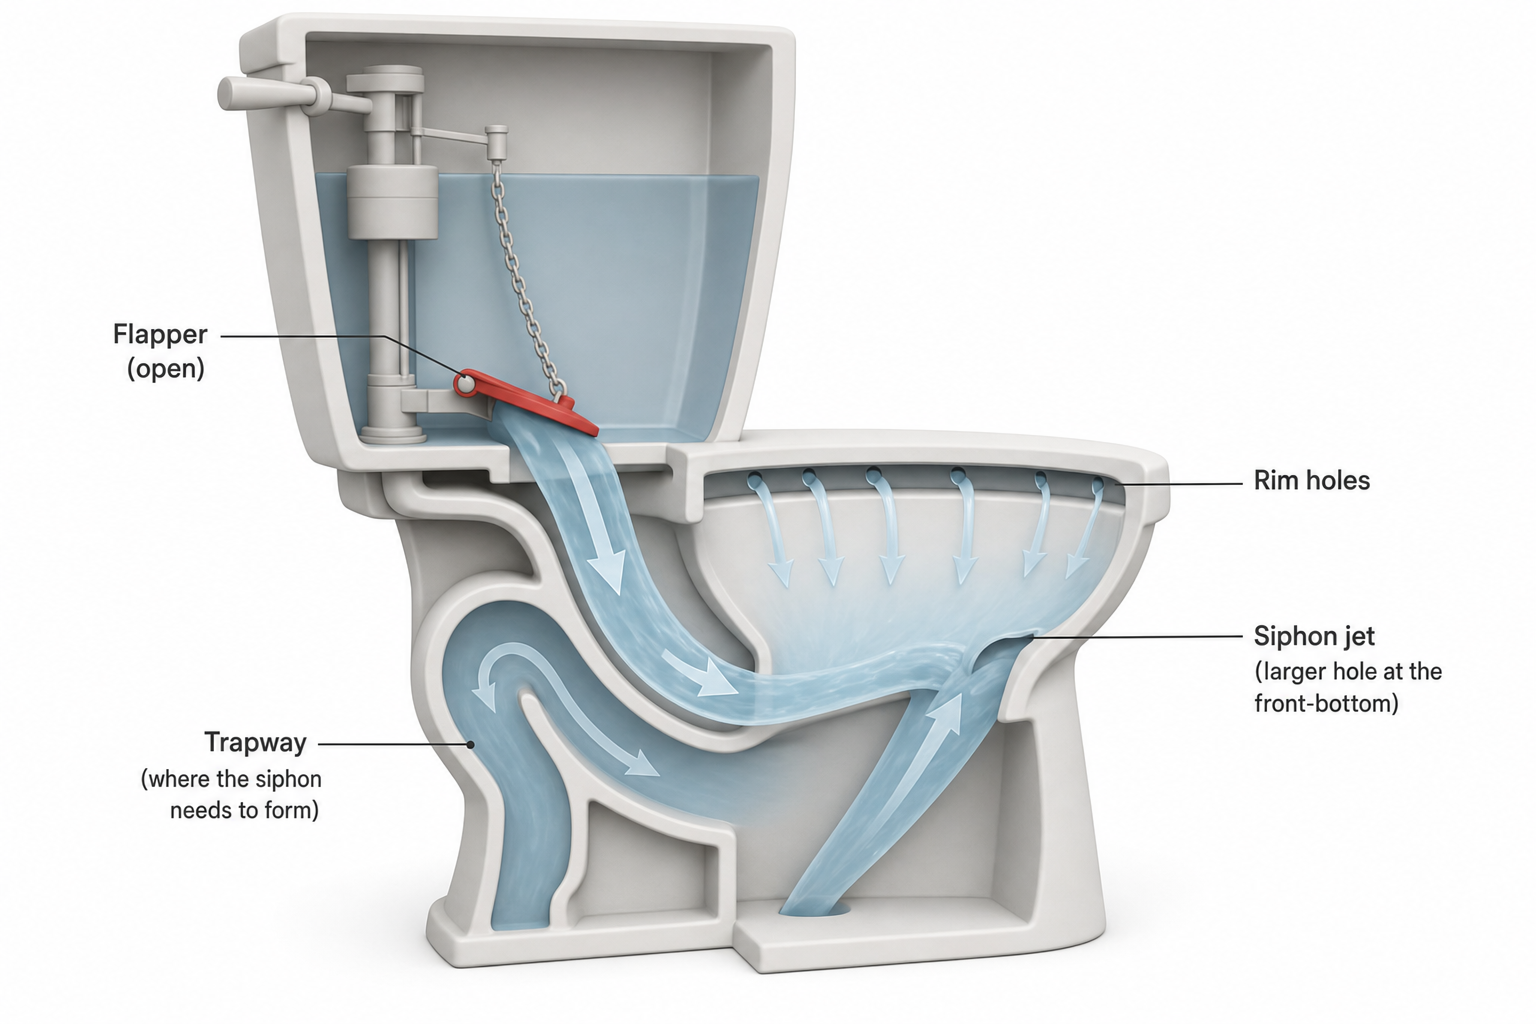
When you press the handle, the flapper (a rubber or plastic seal at the bottom of the tank) lifts, letting the full tank of water drop into the bowl in a rush. That surge of water fills the small rim holes and the larger siphon jet — usually a single larger hole at the front-bottom of the bowl, aimed toward the trapway — which kickstarts a siphon that pulls waste and water up and over the trap. If that rush of water is too slow, too little in volume, or misdirected, the siphon never fully forms, and you get a weak, incomplete flush.
Step 1: Check the Flapper
The flapper is the single most common culprit. Two flapper problems cause weak flushes:
It closes too soon. Watch a flush happen with the tank lid off. If the flapper drops back down after only a second or two — before the tank has mostly emptied — it's cutting the flush short. This can happen because the flapper is warped, brittle, or coated in mineral scale so it doesn't seal or lift the way it used to.
It doesn't lift fully. If the flapper opens only partway before falling back, the chain connecting it to the flush handle arm is likely too short, or it's caught under the flapper itself.
To inspect the flapper:
- Turn off the water supply valve behind the toilet (turn clockwise) and flush to drain most of the tank.
- Reach in and feel the flapper's rubber edge for stiffness, warping, or a slimy mineral coating.
- Check the flapper's rating against your toilet. Many older toilets used a standard 2in flapper, but many newer low-flow and dual-flush models use a 3in flapper or a manufacturer-specific design — an ill-fitting universal replacement is a frequent cause of chronic weak flushes.
If the flapper is worn, cracked, or doesn't seal evenly, replace it. Flappers are inexpensive and sold by size at any hardware store — bring the old one or note the tank's brand and model to match it correctly (see the recommendations below for compatible options).
Replacing a Flapper
- Shut off the supply valve and flush to empty the tank.
- Unhook the chain from the flush lever arm.
- Unclip or slide the flapper off the two pegs (or the overflow tube collar, on some designs) at the base of the overflow pipe.
- Slide the new flapper onto the same mounting point and reconnect the chain.
- Turn the water back on, let the tank fill, and test-flush before replacing the tank lid.
Step 2: Fix the Chain Length
Even a brand-new flapper will underperform if the chain is set wrong.
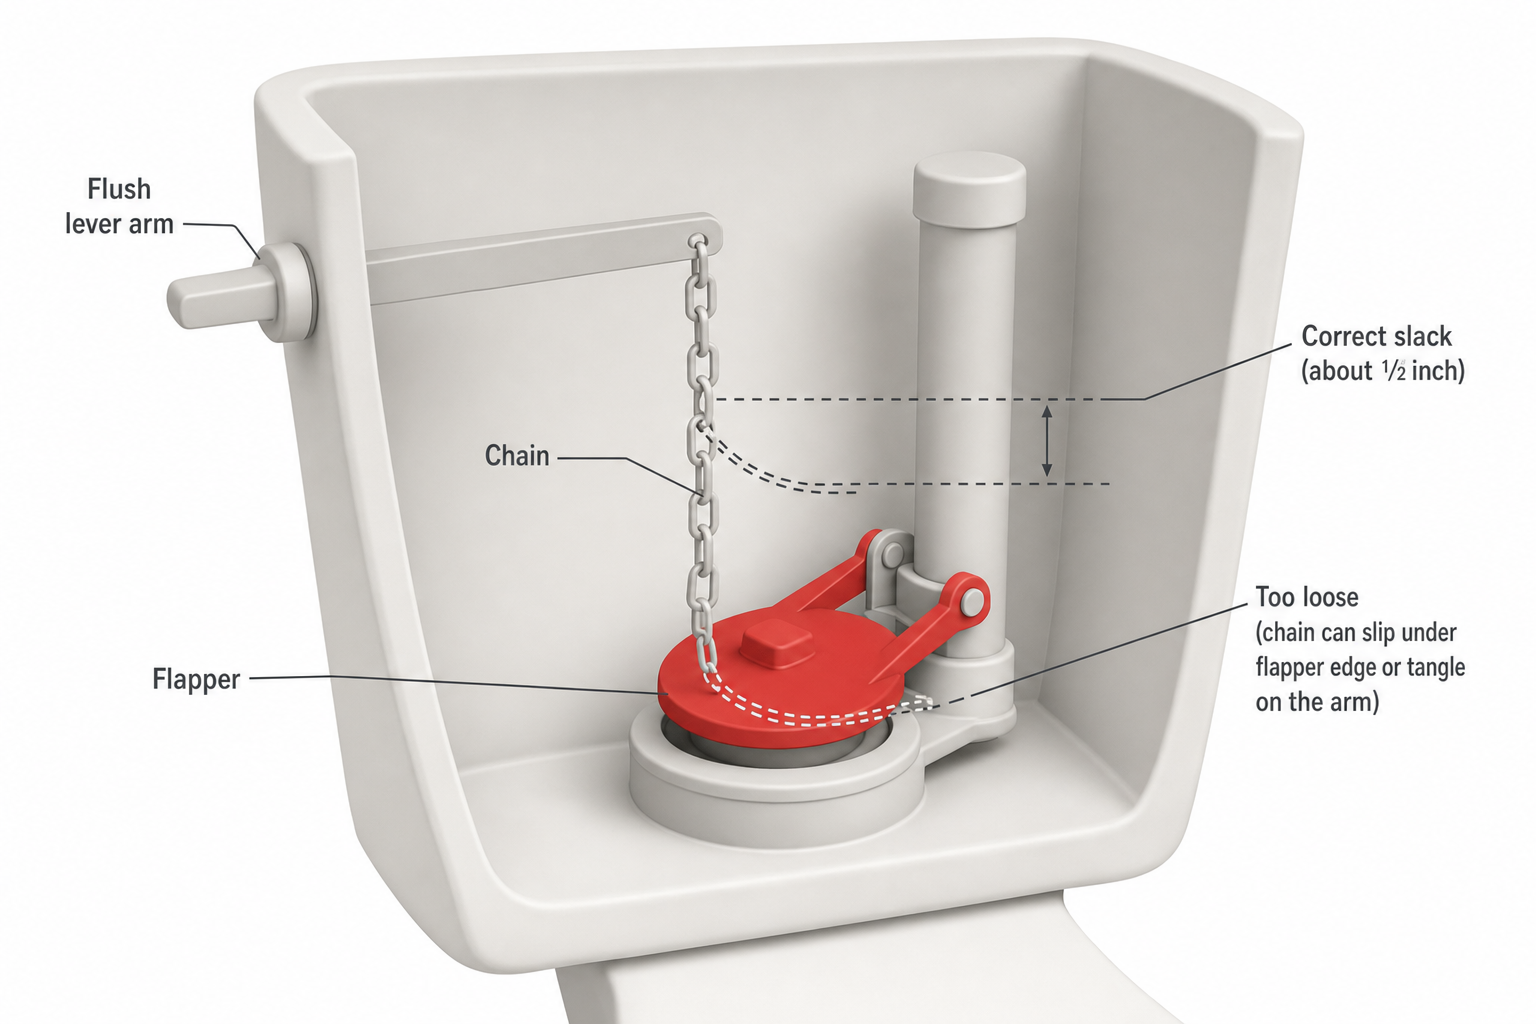
- Too much slack lets the flapper drop before the tank has fully drained, cutting the flush short.
- Too little slack can hold the flapper open too long (running toilet) or, on some designs, prevent it from seating fully.
The right setup: with the flapper closed, the chain should have about 0.5in of slack — enough that it isn't taut, but not so much that it can slip under the flapper edge or tangle on the arm. Most chains have a clip or multiple connection links so you can adjust length in small increments; move the clip to the next link rather than guessing, and trim excess chain so it can't drift into the flapper's seal path.
Step 3: Clean the Siphon Jet and Rim Holes
If the flapper and chain check out but the flush still swirls weakly instead of pulling everything down in one strong pull, mineral buildup in the siphon jet or rim holes is a likely cause — especially common in homes with hard water.
To clean the jet and rim holes:
- Turn off the water and drain the bowl as much as possible (a wet/dry vacuum on the bowl water works well, or flush with the supply off until it's low).
- Look for the siphon jet — a larger hole at the bottom front of the bowl, usually visible once the water level is low — and the smaller rim holes around the underside of the bowl rim.
- Use a small stiff tool, such as a bent piece of wire or a small wire brush, to break up visible mineral crust in the jet and rim holes without scratching the glaze.
- For heavier buildup, apply an acidic descaling product formulated for toilets (following the label directions) directly on the mineral deposits, let it sit as directed, then scrub again.
- Flush several times to test the strength of the flow before declaring it done.
Step 4: Rule Out a Partial Trapway Clog
If cleaning and flapper adjustments don't restore a full flush, a partial obstruction lower in the trapway or drain line is possible — often a buildup of wipes, excess paper, or a foreign object that's narrowing but not fully blocking the passage.
- Try a flanged toilet plunger first, using firm, steady strokes rather than fast jabs, keeping enough water in the bowl to seal the plunger.
- If that doesn't clear it, a closet auger (a specialized plumbing snake with a protective sleeve to avoid scratching the bowl) can reach further into the trapway than a standard drain snake.
- If flushes remain weak after auguring, or if multiple fixtures in the house show slow drainage, the issue may be further down the drain line or vent stack rather than in the toilet itself.
When to Consider Replacing the Toilet
If the toilet is an older low-flow model from the early years of water-saving mandates, it may simply have an underpowered flush design regardless of maintenance — some early low-flow toilets (roughly 1.6in tank fill mechanisms of that era, colloquially, though this varies by model and manufacturer) were notorious for weak siphon action compared to modern pressure-assisted or well-engineered gravity-flush designs. If you've replaced the flapper, corrected the chain, cleaned the jets, and confirmed the drain line is clear, and the flush is still consistently weak, the toilet's internal bowl geometry may be the limiting factor, and a newer model may be the more practical long-term fix.
FAQ
Why does my toilet flush weakly right after I replaced the flapper? The most common reason is a mismatched flapper size or an incorrectly adjusted chain. Double-check that the flapper matches your toilet's original size and that the chain has about 0.5in of slack when the flapper is closed.
Can I use any universal flapper for my toilet? Not always. Many newer and dual-flush toilets use manufacturer-specific flapper shapes or seal mechanisms, and a poor-fitting universal flapper can cause chronic weak flushes or slow leaks. Matching the brand and model, or bringing the old flapper to the store, gives the most reliable result.
Is a weak flush a sign of a clogged vent pipe? It can be, especially if you also hear gurgling from other drains in the house or notice slow draining in multiple fixtures. A blocked or undersized vent stack disrupts the pressure balance needed for a strong siphon, and diagnosing it typically requires a professional inspection.
How often should I clean the siphon jet and rim holes? There's no fixed schedule — it depends heavily on local water hardness. Homes with notably hard water may benefit from checking and cleaning every few months, while homes with soft water may rarely need it.
Will a toilet tank tablet or cleaner damage the flapper? Some chlorine-based in-tank tablets can accelerate deterioration of rubber flappers over time, which is a commonly cited reason for premature flapper failure. If you use tank tablets, inspecting the flapper periodically for softening or cracking is a reasonable precaution.