
A hairline crack in a concrete driveway rarely stays small. Water works its way in, freezes and expands in cold climates, and the crack widens a little more each season. Left alone, small cracks become tripping hazards, invite weed growth, and let water undermine the base beneath the slab. The good news is that most driveway cracks — anything from a hairline up to about 1in wide — are a manageable weekend project if you pick the right filler and prep the crack properly.
Step 1: Assess the Crack Before You Buy Anything
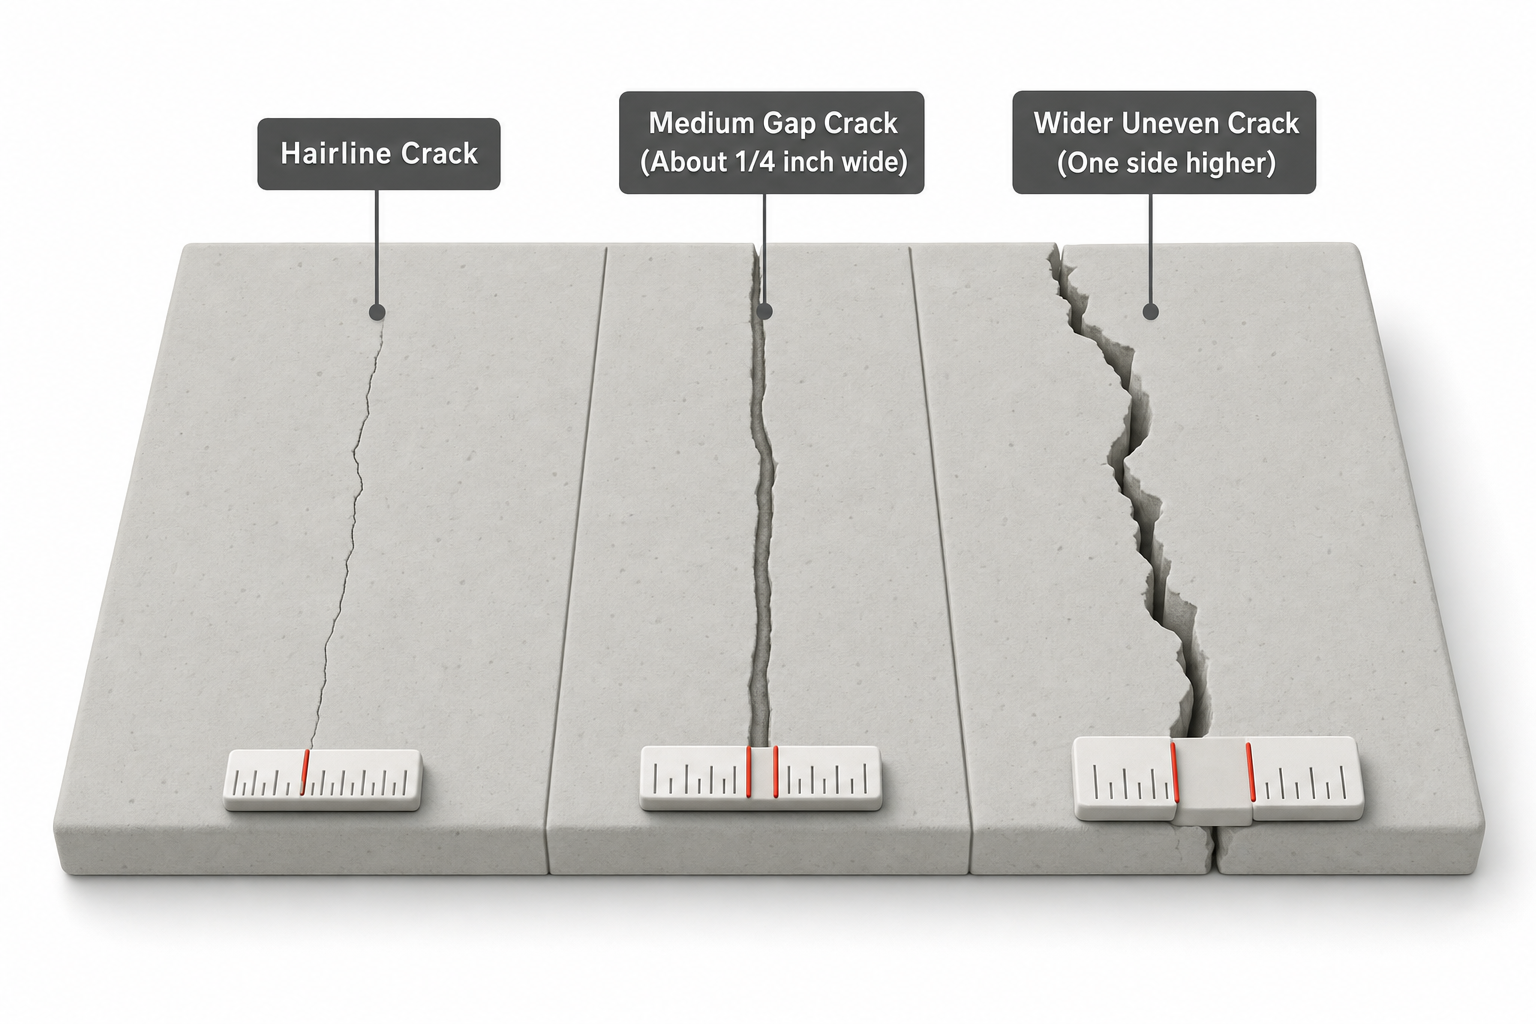
Not all cracks are created equal, and the product you need depends on width and cause:
- Hairline cracks (under 0.13in): Usually cosmetic, caused by normal concrete shrinkage as it cured. A concrete crack sealer or paintable caulk-style filler is sufficient.
- Cracks 0.13in to 0.5in wide: Typically need a pourable or gun-applied concrete crack filler, often a polyurethane or asphalt-based sealant depending on whether the surrounding slab is concrete or asphalt.
- Cracks wider than 0.5in, or where one side sits higher than the other: This is a sign of settling, soil movement, or a failing sub-base rather than simple shrinkage. Surface filler will not fix the underlying problem and may crack again within a season.
[!safety] If a crack is part of a larger slab that has heaved, sunk more than roughly 1in, or shows signs of separating from the foundation or garage slab, have a foundation or concrete contractor evaluate it before you fill anything. Underlying settlement issues are a structural concern, not a cosmetic one.
Step 2: Choose the Right Filler Type
Crack fillers generally fall into a few categories, each suited to different crack widths and movement levels:
- Concrete caulk (siliconized acrylic or polyurethane sealant in a caulk tube): Best for hairline to narrow cracks. Flexible, paintable, and easy to apply with a standard caulking gun.
- Pourable liquid crack filler: Self-leveling, good for horizontal cracks 0.25in to 0.5in wide. Poured directly from the bottle into the crack.
- Two-part epoxy or polyurea filler: Rigid once cured, best for structural or non-moving cracks where you want a strong, permanent bond. Not ideal for cracks that will keep expanding and contracting with temperature.
- Elastomeric (flexible) sealant: Designed to move with the crack as concrete expands and contracts seasonally. This is generally the better choice for driveways in regions with hard freeze-thaw cycles, since a rigid filler can crack again as the surrounding concrete shifts.
- Sand-mix concrete patch: For wider cracks or small spalled (crumbling) areas, a trowel-applied sand-topping mix bonds better than liquid filler and can be finished flush with the surrounding surface.
[!region] Freeze-thaw exposure varies a lot by climate, and some manufacturers formulate fillers specifically as "freeze-thaw resistant" or rate them for a minimum service temperature. Check the local climate guidance on the product label rather than assuming any filler works everywhere — this varies by brand and formulation.
Step 3: Clean and Prep the Crack
Proper prep is the single biggest factor in whether a crack repair actually lasts.
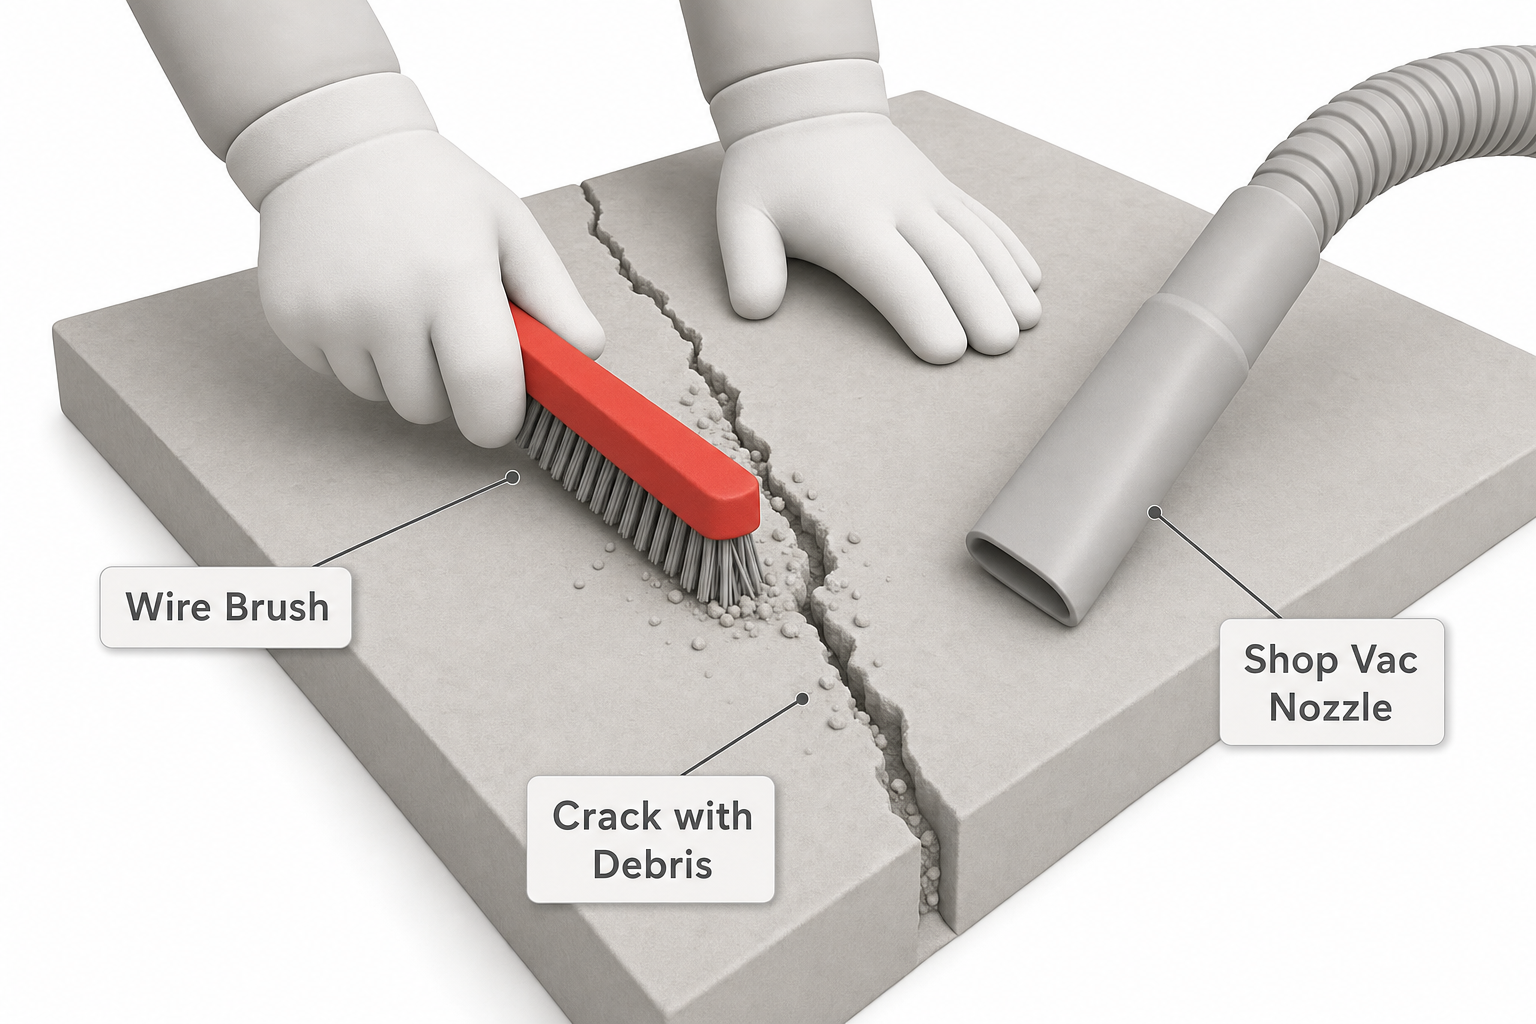
- Remove loose debris. Use a wire brush or the edge of a flathead screwdriver to knock out loose concrete, dirt, and old sealant from inside the crack.
- Clear vegetation and roots. If grass or weeds are growing through the crack, pull them out by hand or treat with a general herbicide a few days beforehand, then remove the dead roots.
- Vacuum or blow out the crack. A shop vac or compressed air removes fine dust that would otherwise prevent the filler from bonding to bare concrete.
- Widen very thin hairline cracks slightly if needed. For cracks under 0.06in, some pros use a angle grinder with a masonry blade or a crack chaser bit to open the crack to about 0.25in wide and 0.25in deep, which gives the filler more surface area to grip. This step is optional for cosmetic hairline cracks but improves durability for cracks that are actively growing.
[!safety] Wear safety glasses and a dust mask when grinding or wire-brushing concrete — the dust contains silica, which is a respiratory hazard with repeated exposure. If using a grinder, also wear hearing protection.
- Let the crack dry completely. Most fillers require a dry surface to bond properly; avoid this project within {measure:24} hours of rain, and check the manufacturer's minimum cure temperature, since many sealants won't cure properly below about 40°F.
Step 4: Fill the Crack
For Narrow Cracks (Caulk-Style Sealant)
- Cut the tube nozzle at an angle to roughly match the crack width.
- Load the tube into a caulking gun and run a steady bead along the crack, pushing the tip slightly ahead of the bead to force material down into the gap rather than just across the surface.
- Smooth the bead with a putty knife or a gloved finger dipped in soapy water, tooling it slightly concave so water sheds off rather than pooling.
- Let it skin over per the label instructions (commonly {measure:1} to {measure:4} hours) before allowing foot traffic, and avoid driving over it for at least {measure:24} hours.
For Wider Cracks (Pourable or Sand-Mix Filler)
- For pourable liquid filler, slowly pour it directly into the crack, filling to just below the surrounding surface level. Overfilling causes pooling and an uneven finish.
- Allow the first pour to soak in and settle for the time specified on the label — often 30 minutes to an hour — then add a second pour if the level has dropped, since most pourable fillers shrink slightly as they cure.
- For sand-mix patches, dampen the crack edges first, then pack the mix in with a pointing trowel, overfilling slightly and striking it flush with a straightedge.
- Feather the edges so the patch blends with the surrounding texture rather than sitting as a raised ridge.
For Backer Rod in Extra-Wide Cracks
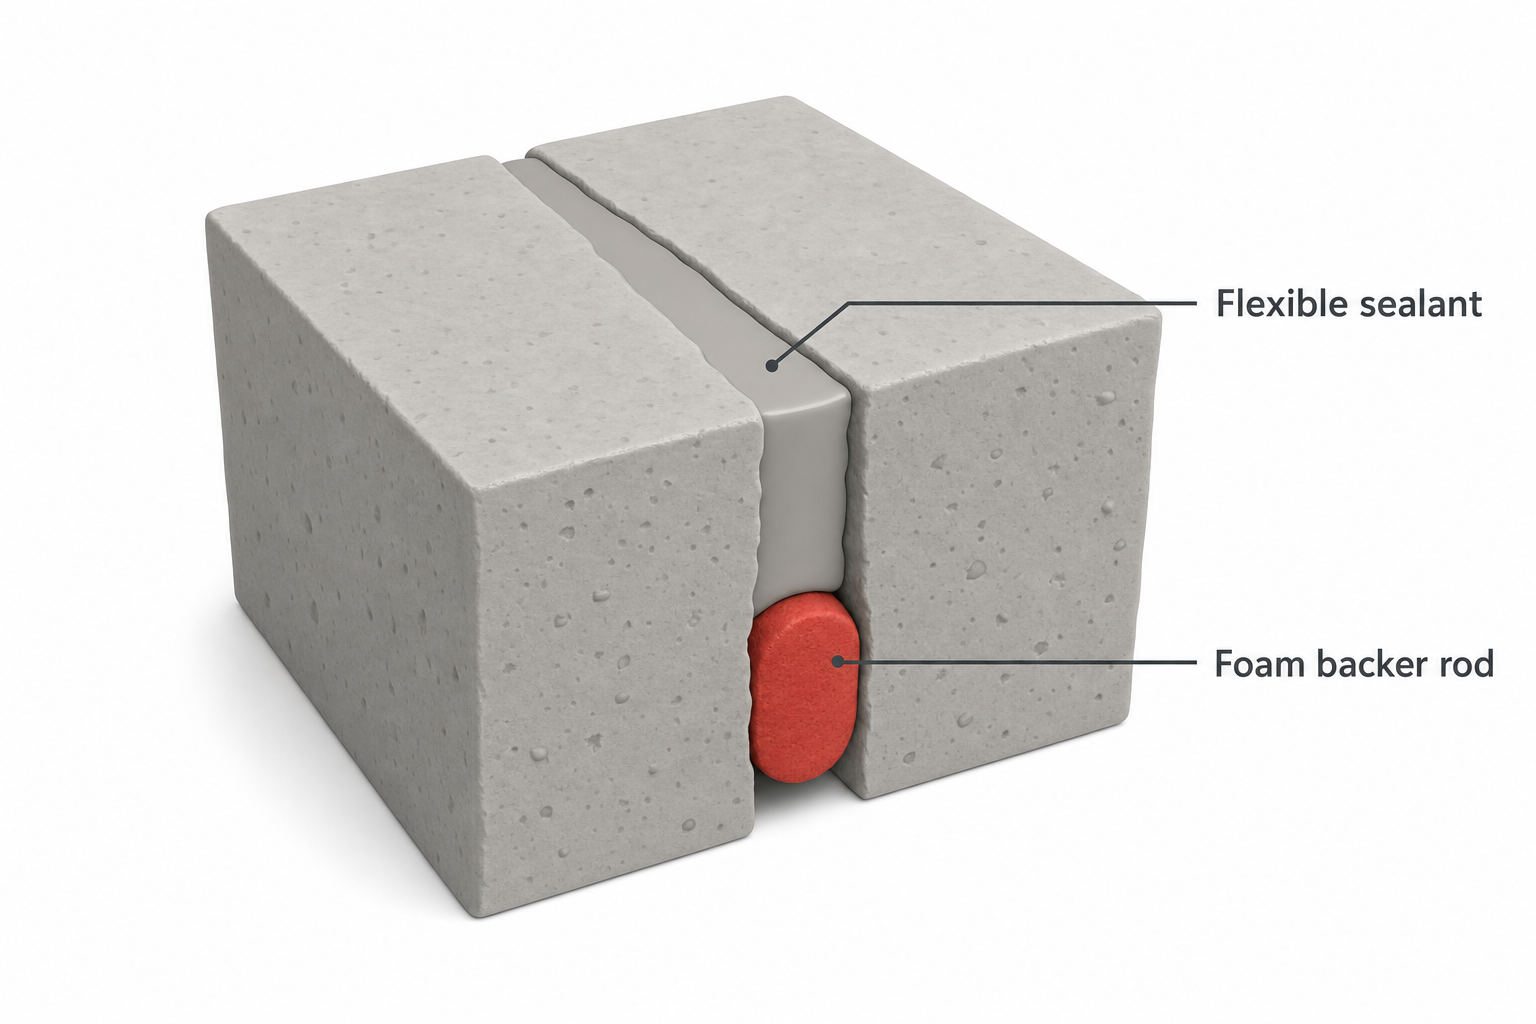
For cracks wider than about 0.5in, pack a foam backer rod into the bottom of the crack before applying sealant. This prevents the filler from sinking too deep, gives it a surface to bond against on two sides instead of three (which lets it flex properly), and reduces how much product you need.
Step 5: Cure, Seal, and Prevent Recurrence
- Respect cure times. Most fillers need at least {measure:24} hours before light foot traffic and {measure:48} to {measure:72} hours before you drive a vehicle over the repair — check your specific product's label, since cure time varies by formulation and temperature.
- Consider a full driveway sealcoat. Once crack repairs have cured, applying a driveway sealer over the entire surface every few years helps prevent new cracks by keeping water from penetrating the concrete and reducing UV degradation. This is a separate product from crack filler — see the recommendations below for sealant options.
- Improve drainage around the slab. If cracks keep forming in the same area, check whether water is pooling nearby or draining toward the driveway from a downspout or grade slope. Redirecting water away from the slab reduces the freeze-thaw cycling that drives cracking.
- Watch for recurring cracks in the same spot. If a repaired crack reopens within a season, that's often a sign of ongoing sub-base movement rather than a filler failure, and may warrant a professional evaluation.
FAQ
How wide of a crack can I fill myself? Most homeowners can safely repair cracks up to about 0.5in to 1in wide using pourable filler, backer rod, or a sand-mix patch. Wider cracks, especially with vertical displacement between the two sides, usually indicate a structural or drainage issue that's worth having a professional assess.
Should I use caulk or a rigid epoxy filler? It depends on whether the crack will keep moving. Flexible sealants (polyurethane, elastomeric caulk) handle seasonal expansion and contraction better and are generally preferred for driveways in freeze-thaw climates. Rigid epoxy is stronger but can re-crack if the surrounding slab keeps shifting.
How long should I wait before driving on a filled crack? Check the product label, but a common range is {measure:24} hours for foot traffic and {measure:48} to {measure:72} hours before parking a vehicle on it. Cold or humid weather can extend cure times significantly.
Why does my crack keep coming back after I fill it? Recurring cracking in the same spot is usually a sign that the sub-base beneath the slab is settling, eroding, or shifting with freeze-thaw cycles, rather than a filler problem. Surface repairs can't fix an unstable base, so persistent cracking is worth having evaluated by a concrete contractor.
Can I fix a crack in the rain or right after it rains? No — most fillers need a dry, clean surface to bond properly. Wait until the crack has had at least {measure:24} hours to dry out fully, and check the weather forecast to avoid rain before the product cures.