
If your refrigerator door won't seal properly, you'll usually notice it before you see it: the compressor runs more often, ice builds up around the freezer edges, or you feel a faint draft of cold air near the door when you walk by. A poor seal forces the compressor to work overtime, which wastes energy and can shorten the appliance's life. The good news is that most sealing problems come down to three fixable causes — a dirty or worn gasket, a misaligned door, or hinges that have loosened over time.
This guide walks through diagnosing which of these is happening in your fridge, then fixing each one, starting with the simplest and cheapest option first.
Step 1: Confirm There's Actually a Seal Problem
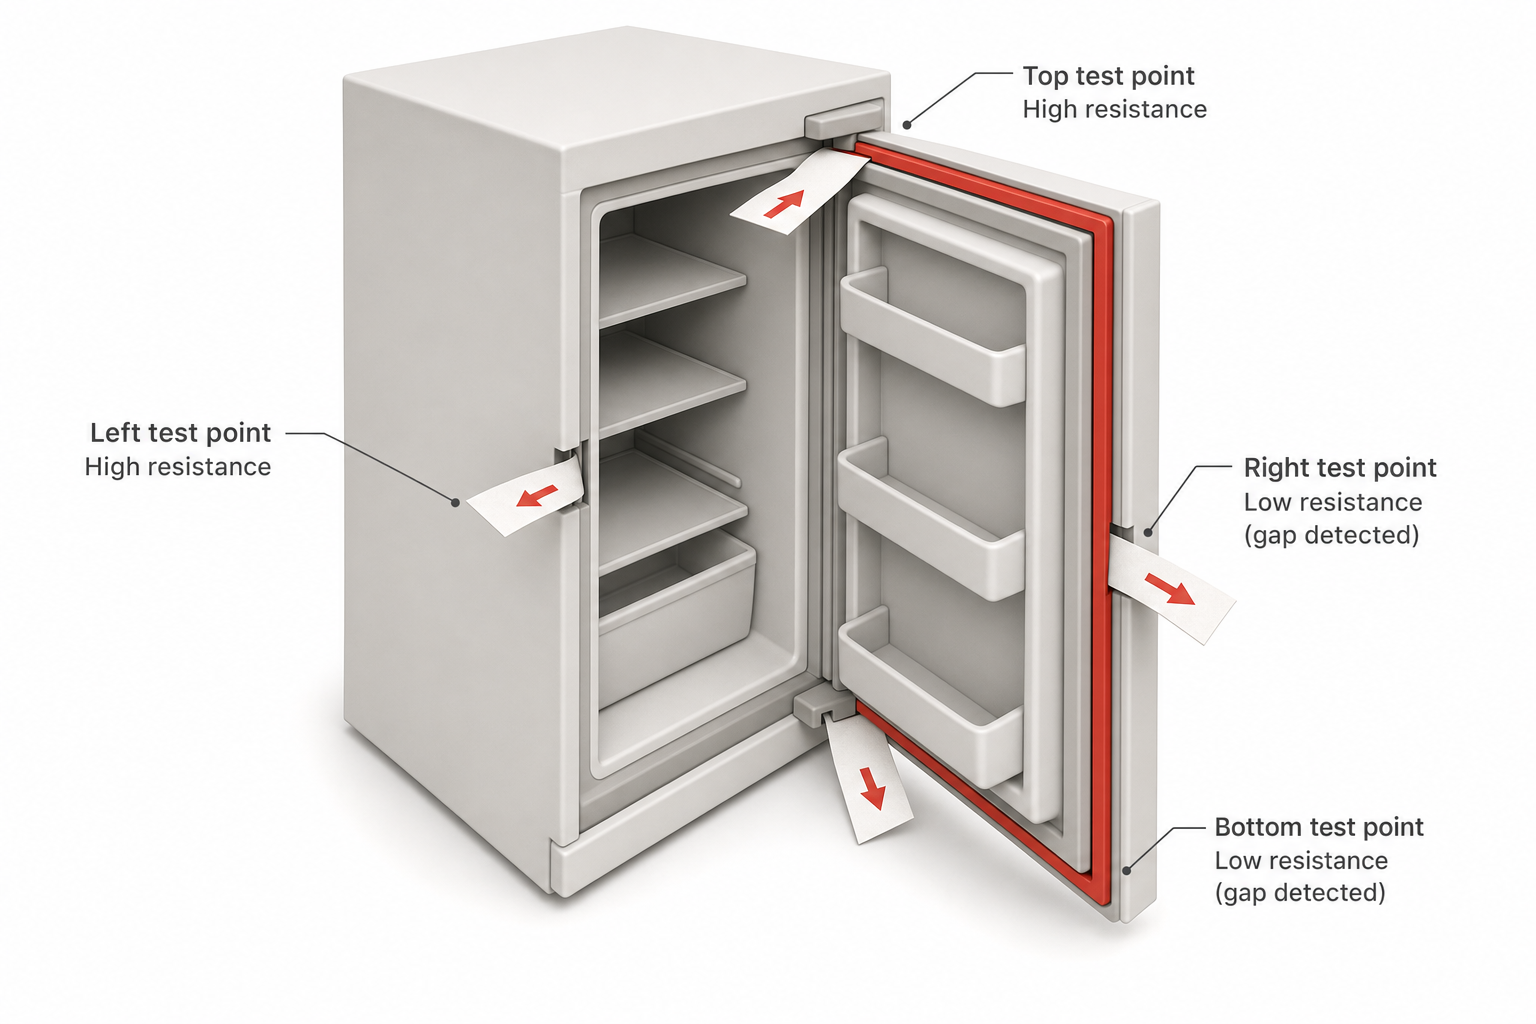
Before you start disassembling anything, run the classic dollar-bill test:
- Close the refrigerator door on a piece of paper or a bill so that half sticks out.
- Pull the paper out slowly. You should feel resistance the entire time.
- Repeat this at multiple points around the door — top, bottom, and both sides, not just the middle.
If the paper slides out easily in one spot but not others, you've found the leak location, which tells you whether the problem is localized (suggesting gasket damage or hinge sag) or affects the whole perimeter (suggesting the gasket has hardened or shrunk overall).
Step 2: Clean the Gasket Thoroughly
Grease, food residue, and dried spills are the most common — and easiest to fix — reason a refrigerator door won't seal. The rubber gasket needs to be soft and slightly tacky to grip the cabinet frame; grime turns it stiff and slick.
- Mix warm water with a small amount of mild dish soap.
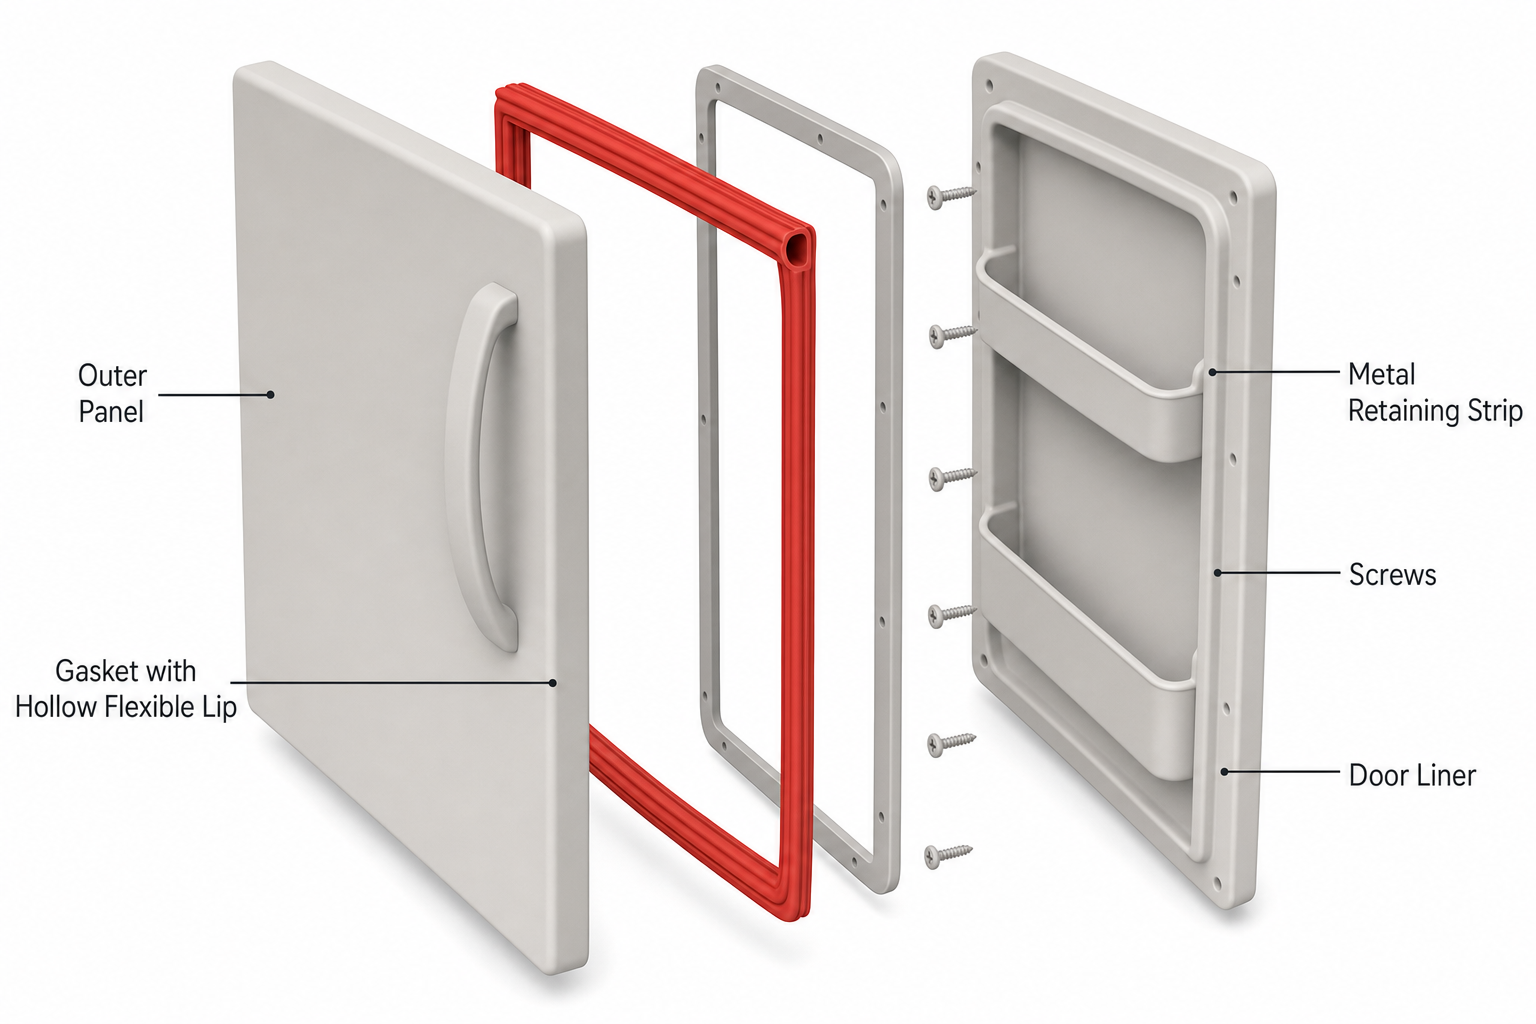
- Fold back the gasket's flexible lip (most gaskets have a hollow, flexible flap) and wipe inside it as well as the visible surface — debris often hides in the fold.
- Use a soft toothbrush or cotton swab for the corners and any pleats.
- Rinse with a cloth dampened in plain water to remove soap residue, then dry completely.
- Once dry, apply a thin layer of food-grade silicone grease or plain petroleum jelly to the gasket surface. This restores flexibility and helps it grip the cabinet without sticking permanently.
Run the dollar-bill test again. If the seal is now snug everywhere, you're done. If certain sections still fail, move to hinge alignment.
Step 3: Check and Adjust the Hinges
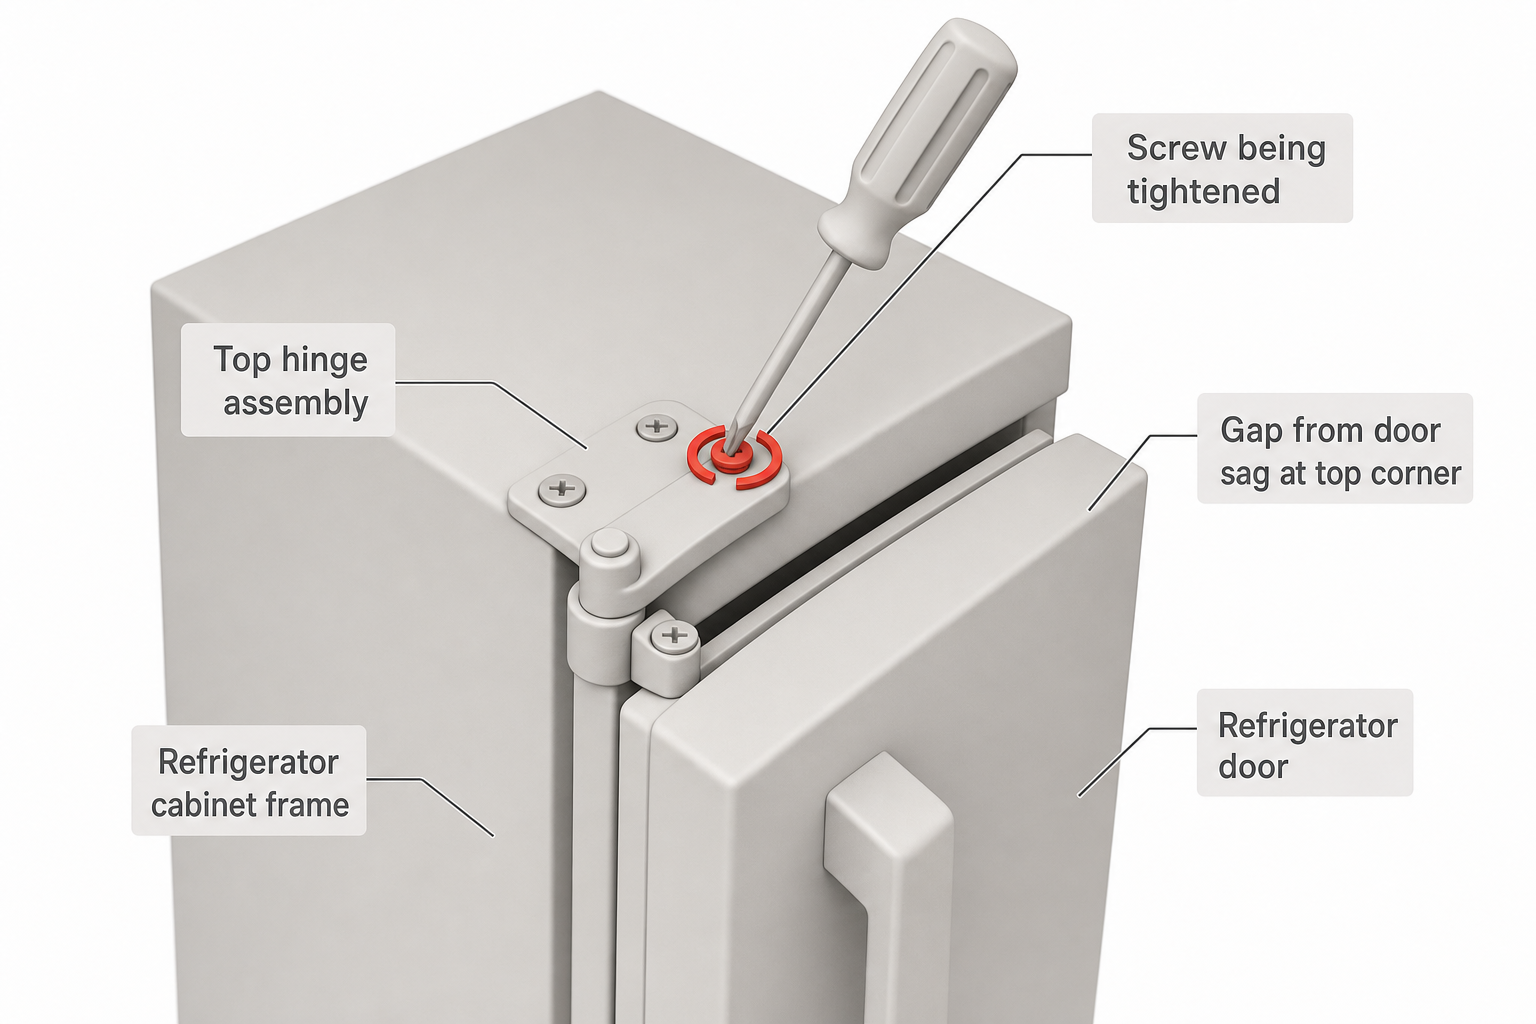
Over years of opening and closing, hinge screws loosen and the door can sag slightly, tilting it just enough that the gasket no longer meets the cabinet evenly — usually worse at the top or bottom corner opposite the hinge.
- Open the door and inspect the top and bottom hinge screws for looseness or visible gaps between the hinge plate and the cabinet.
- Tighten all hinge screws with the appropriately sized screwdriver (usually Phillips head), snugging them firmly but without stripping the threads in the particleboard or metal frame.
- If the door still hangs unevenly, some refrigerators have adjustable hinge plates or shims — check whether washers or spacers can be added behind the hinge to square the door with the cabinet opening.
- Close the door and re-check with the dollar-bill test at the previously failing spot.
Step 4: Reshape a Gasket That's Just Misshapen
Gaskets that have been folded, pinched, or compressed for a long time (for example, from something stored against the door) can sometimes be coaxed back into shape without full replacement:
- Warm the gasket gently with a hairdryer on a low setting, moving constantly to avoid overheating any one spot.
- While warm, use your fingers to reshape the flattened or twisted section back to its natural curve.
- Hold it in place for 30–60 seconds as it cools, or use spring-loaded clothespins/binder clips as a temporary brace while it sets.
This works for minor deformation but won't help gaskets that are cracked, torn, or permanently hardened — those need replacement.
Step 5: Replace a Worn or Damaged Gasket
If the gasket is cracked, torn, brittle, or has lost its elasticity (it stays wrinkled instead of springing back when pinched), cleaning and reshaping won't restore the seal. Replacement is a straightforward DIY job on most models.
- Identify your model's part number. Check the manufacturer's label inside the fridge (usually on a side wall or near the crisper drawers) for the model number, then look up the correct gasket part — gaskets are model-specific and not universal.
- Loosen the retaining screws or clips. Most gaskets are held by a metal retaining strip screwed around the inner edge of the door, or by clip channels the gasket snaps into. Loosen these without removing them completely — new gaskets typically install into the same channel.
- Warm the new gasket if it's arrived folded in packaging; a few minutes near a heat source (not direct high heat) makes it pliable and easier to seat into the channel.
- Work the gasket into the channel a section at a time, starting at one corner and working around the perimeter, tucking the flange in behind the retaining strip.
- Tighten the screws gradually and evenly rather than fully tightening one section before moving on, to avoid puckering the gasket.
- Test the seal with the dollar-bill method around the full perimeter once installed.
When It's Not the Gasket at All
If the gasket looks fine, the hinges are tight, and the door still won't seal, consider these less common causes:
- A warped door panel, often from heat exposure (a nearby oven, direct sunlight, or a dishwasher vent) or age. This usually requires door or panel replacement.
- An unlevel refrigerator. If the unit itself is tilted, gravity can pull the door open slightly or prevent even gasket contact. Adjust the front leveling legs (usually turned with a wrench or by hand) so the fridge tilts back very slightly — most manufacturers recommend the front edge sit marginally higher than the back so the door self-closes.
- Overloaded door bins pulling the door out of shape over time; redistributing weight can sometimes help, though a warped door will still need replacement.
FAQ
Why won't my refrigerator door seal even after I cleaned the gasket? If cleaning didn't help, the gasket may be permanently hardened or stretched from age, the door itself may be misaligned or warped, or the fridge may not be level. Work through the hinge and leveling checks above before assuming you need a new gasket.
Can I use household glue to fix a torn gasket? It's not recommended as a long-term fix. Adhesives rarely flex the way the rubber needs to and typically fail again within weeks; a proper replacement gasket sized for your model is more reliable.
How often should refrigerator gaskets be replaced? There's no fixed schedule — it depends on usage and how well the gasket is cleaned and maintained. Replace it whenever it's visibly cracked, stiff, or fails the dollar-bill test, regardless of the fridge's age.
Will a bad seal actually raise my energy bill? A door that doesn't seal lets cold air escape and forces the compressor to run more frequently to maintain temperature, which does increase energy use. The exact impact varies by climate, fridge model, and how severe the leak is.
Is it worth replacing the gasket on an old refrigerator? If the fridge is otherwise running well and the gasket is the only issue, replacing it is usually far cheaper than replacing the whole unit and can meaningfully improve efficiency. If multiple components are failing, weigh the repair against the cost of a newer, more efficient model.